TeacherAssistant - Technical Overview
TeacherAssistant is a desktop application built with
PySide6 (Qt) and the custom PySideAbdhUI library. It provides
teachers with a unified interface to manage student rosters, educational resources,
behavioral observations tracking and etc. The application follows a modular architecture: the entry
point main.py bootstraps the environment, establishes a database connection with PostgreSQL via
a modal dialog, and instantiates the main window. All global state—theme, fonts, language,
and connection settings—is centralised in a singleton AppContext, which persists
user preferences to a settings.json file stored in the user’s local application
data directory. The UI is constructed by MainWindow (a subclass of
AbdhWindow), which features a left navigation panel,
a right settings panel, and a central page stack. Pages such as StudentListPage
(the default home view), EduResourcesView,
EducationalResourceEditor, and DatabaseManagerPage are loaded dynamically without restarting the application.
From a developer’s perspective, the project enforces absolute imports by patching
sys.path, and all icons are sourced from Lucide (Free version),
compiled into a Qt resource module (resources_rc.py) via a dedicated script. The build pipeline
is explicitly documented: after installing the proprietary PySideAbdhUI
dependency (via local wheel, editable install, or GitHub), the developer compiles resources, then packages
the application with PyInstaller using a custom .spec file.
Finally, a Windows installer is generated with InnoSetup. The codebase also
includes placeholders for future features (e.g., a disabled “Notebook” button) and supports
runtime switching of themes, font families, and interface direction (LTR/RTL). This design
makes TeacherAssistant both a production‑ready tool and a well‑documented reference for
Qt/PySide application development.
🔗 Full source code available at:
abdhmohammadi/TeacherAssisstantApplication entry & lifecycle -
main.py
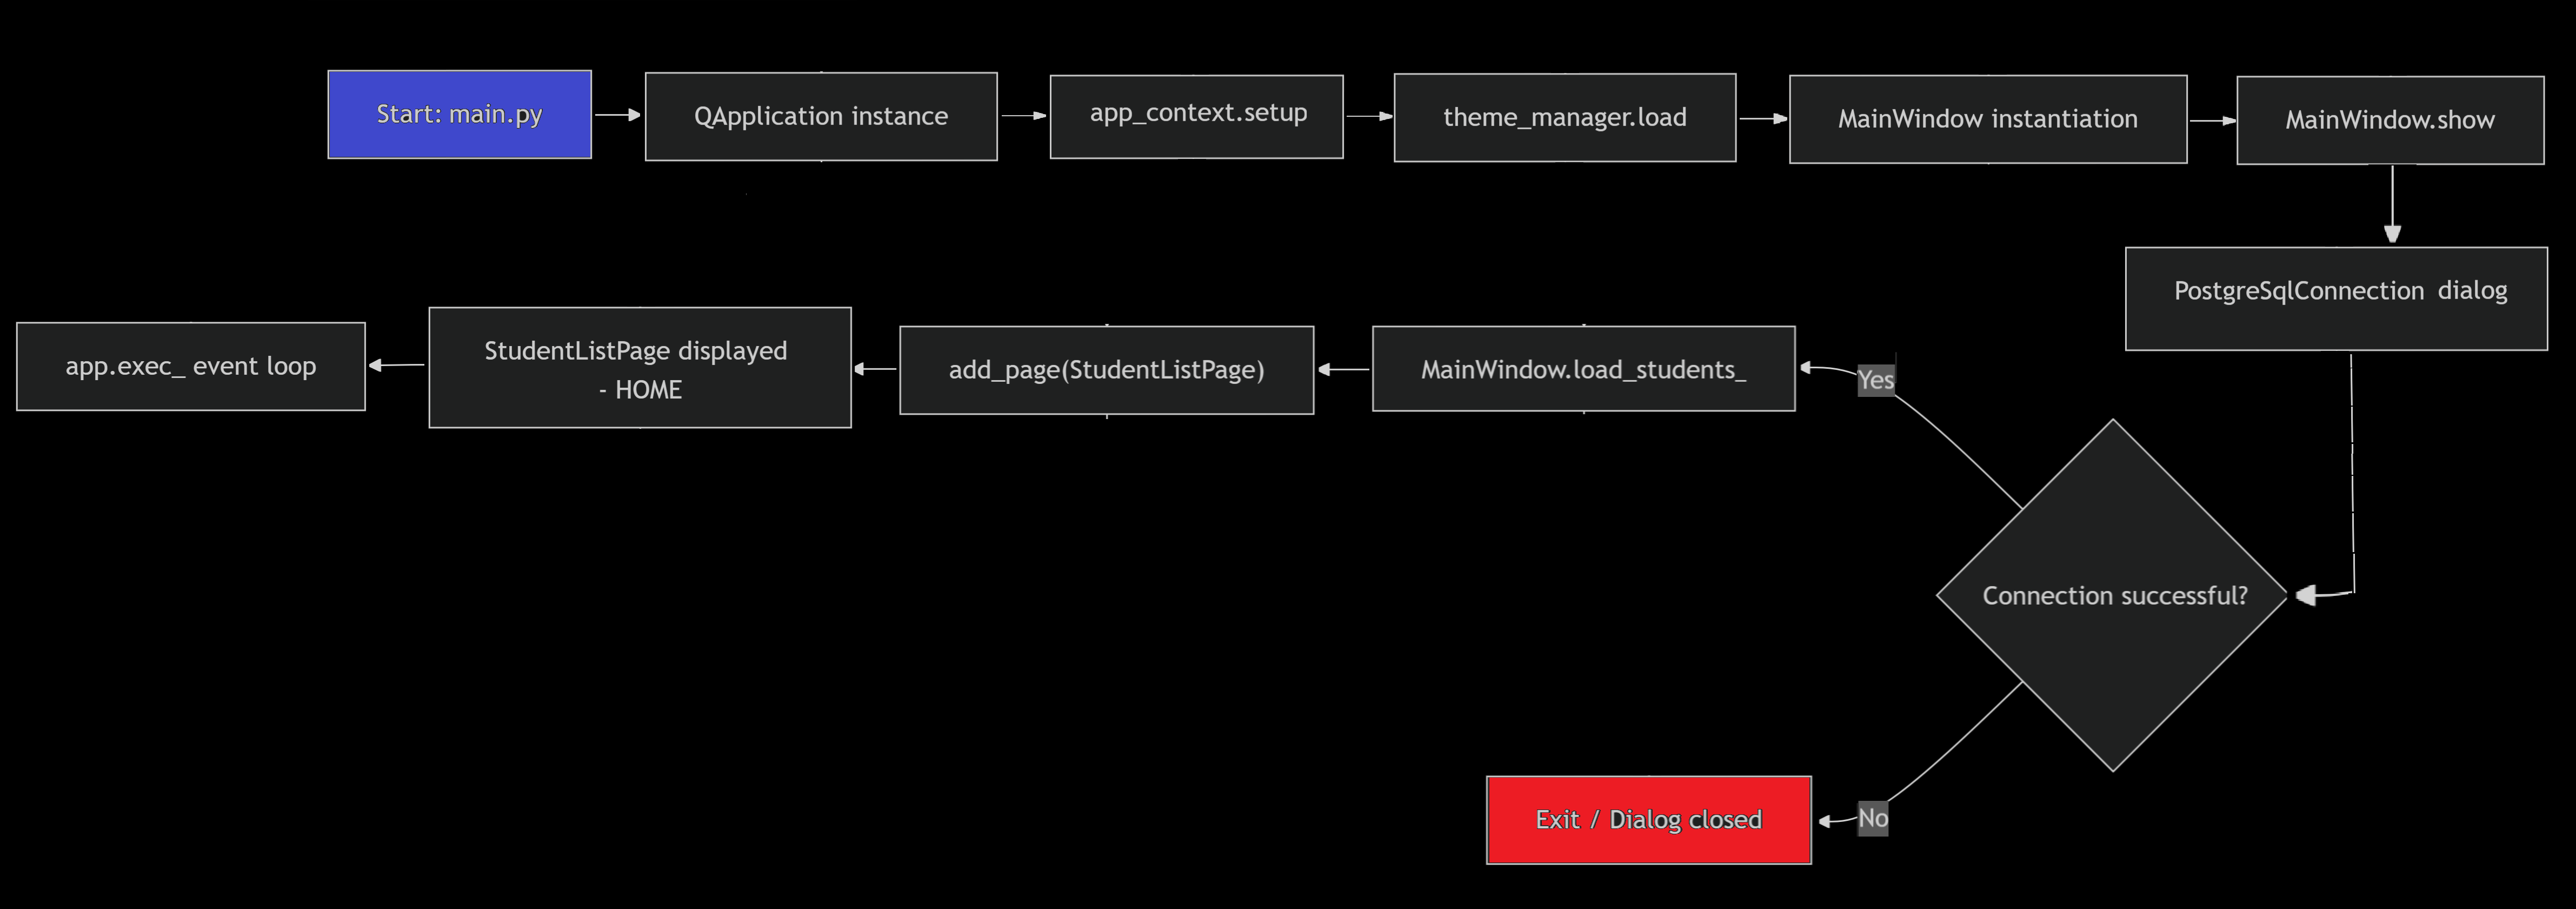
The program execution flow from start to display of the first page is shown in the image below. First of all, the PySideAbdhUI package and other required packages of the program must be installed. To install PySideAbdhUI, you can use:
pip install git+https://github.com/abdhmohammadi/PySideAbdhUI.git
or use a local package to install it. After installing the required packages, env\Scripts\activate
must be activated via the terminal. Now the program is ready to run, The steps are summarized in the list below.
- Sys.path manipulation:
Add the
srcdirectory to the Python path to allow for absolute imports, This is crucial for making the project runnable from any location - Global access setup: Access to configuration files, templates, and themes is set by the AppContext module.
app_contextholds global state (theme, settings, DPI, resources) and provides helper classes to manage this resources. - MainWindow: The main window is created. Then the login dialog for connecting to the database opens.
- Event loop: Using
app.exec()the application starts and the list of students is displayed. For now the page of the Student List is considered as the home page.
📁 Settings location (Windows): Planed
🔧 Settings stored: UI (theme, language, font), backup/restore paths, PostgreSQL tools path.
Building & creating installer
Building and publishing the application involves the following main steps:
🔨 Step 1 - install PySideAbdhUI (dependency)
pip install [local directory]\PySideAbdhUI-[version]-py3-none-any.whl
pip install -e [local directory]\PySideAbdhUI
pip install git+https://github.com/abdhmohammadi/PySideAbdhUI.git
Step 2 - Compile Qt resources
To make the resource portable, we embed all Icon resources to the app in the qrc format.
scripts/compile_qrc.py generates resources_rc.py and is imported in app_context.
any change icons in resources/, need to run scripts/build_qrc.py to update resources, then re‑compile.
🖥️ Step 3 - Create executable pack
To publish the app for Windows OPs we create intallation package in two steps. First we use
Pyinstaller to make exe file then
use InnoSetup tools to publish the app as Setup.exe pack.
Pyinstaller uses TeacherAssistant.spec to create the executable file. and saves it into
dist folder. This folder is placed in the root directory, but the developer can change it when running PyInstaller.
After PyInstaller produces the executable file, the official installer is created with InnoSetup. below tow option is available
for PyInstaller:
pyinstaller .\scripts\TeacherAssistant.spec
If PyInstaller is not in the PATH can be avialable by:
C:\Users\[user name]\AppData\Roaming\Python\Python314\Scripts\pyinstaller .\scripts\TeacherAssistant.spec